

How To Make A Stone Patio
Paul has been upgrading his home for the past five years. This labor of love has proved to him that learning is a lifelong journey.

This guide will show you how to put together your own maintenance-free paving stone patio.
How to Build and Extend Your Patio With Paving Stones
How would you love to have a maintenance-free paving stone patio? Installing paving stones is easy and the results are well worth the effort. Here are all the steps on how to install pavers and extend or build a maintenance-free paving stone patio.
Your stone patio will never rot and will never need staining. It will last a lifetime and add beauty and value to your home. And the best part is that you will never get a sliver from a stone patio. So here are the easy steps on how to build your own maintenance-free stone patio.
Planning Your Stone Patio
Paving stones come in a variety of shapes, sizes, and colors. But it's very hard to tell what you like by looking at a bunch of paving stones stacked in store lot. So before you visit your favorite home improvement store, go for a walk around the neighborhood. In fact, go for a drive and look at many neighborhoods. Many homes have paving stone sidewalks, entrances, and even driveways.
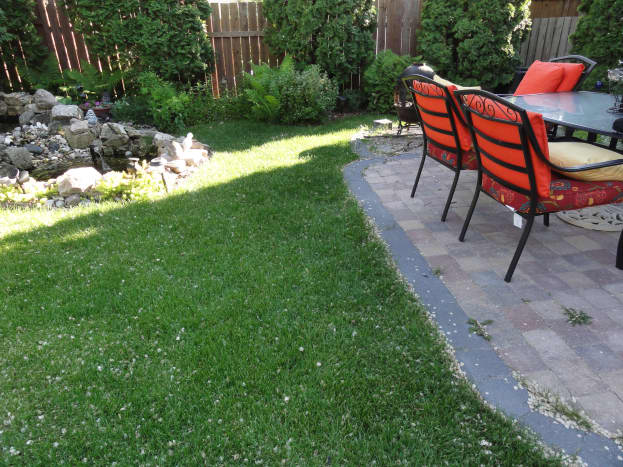
Observing existing stone paved entrances will greatly help you determine that perfect type of stone and color for your patio. I had removed my old wooden deck and built a new stone patio complete with steps a few years ago, and now it's time to expand the patio. The steps in expanding an existing stone patio are exactly the same steps used to build a new stone patio and are easy to follow. Here's how.

Tuscany pavers, stacking stones, and coping stones.
Choosing the Right Paving Stone for Your Patio
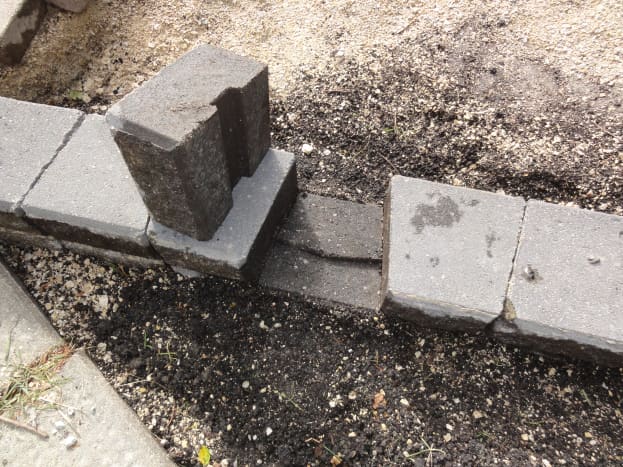
For my stone patio, I used charcoal grey stack stones and coping stack stones for the edging. The coping stones are the flat top stones. Stackers are used to build retaining walls, and coping stones are used as the top stone to provide a smooth top surface. Stackers are formed with a groove on the bottom side and a raised channel on the top. Coping stones have a groove on the bottom, which allows them to fit snugly on top of the stack stones. I used stack stones extensively to create my steps and also for the edging to provide a solid border that will not shift over time.
I also used Tuscany pavers, but you can use any number of stone styles available. (Another popular stone paver used today is Roman pavers.) Tuscany pavers come in a mixed bundle of four different sizes, each having a common width of six inches. For Tuscany pavers, you simply lay the pavers in a straight line using alternate length stones in the process. These paving stones are very easy and quick to install, and the finished patio looks great. Roman pavers also have a great look, but they come in four different sizes as separate bundles. Roman pavers are designed for installation in certain patterns, similar to a fishbone style pattern.
Preparing the Area for the Stone Patio
Prepare the Area
Whether you are building a new stone patio or adding to an existing stone patio, it's a good idea to mark the area your patio will cover. You can use spray paint to mark the ground. You can tie guide strings along the perimeter of the patio, and also lay out several stones to help determine exact measurements required to minimize cutting later. I find using real stone placement to mark the patio edge can be a real time-saver. The less paving stones you need to cut, the better.
Once the area is marked, dig out the area within using your favorite shovel. I dig approximately four inches down to allow several inches of quarter down limestone to be layered in prior to stone placement. The top of the patio should be just a little higher than the surrounding ground area, maybe an inch at most would suffice.
Installing the Border Stack and Coping Stones
Setting the Border Stones
With the area dug out, you are now ready to start laying down the border stack stones. First layer down an inch of quarter down crushed Iimestone along the border areas. I use quarter down crushed limestone for patios, no sand or heavier rocks are required unless you are back filling step retaining walls. For step and retaining walls, fill using three quarter down limestone first, pack, and then use a layer of quarter down limestone for lining the pavers.
Smooth the limestone out with a trowel or piece of wood. I prefer using a garden trowel or small garden shovel, as it has sharp smooth edges and easily creates an even surface when pressed over the crushed limestone. The crushed limestone should have some water content. When pressed with the garden trowel, the wet crushed limestone easily spreads and moulds to a flat surface. If you find the limestone to be dry and powdery, simply take your garden hoe and gently spray some water over the area.
Once you have a flat smooth surface, lay the first stack stone in place. Place a coping stack stone on top of the base stack stone. The coping stones are flat on top and provide a smooth finished surface. Continue the process of smoothing the crushed limestone and placement of stack stones, following the shape of the dugout area for your patio. Use a level for each coping stack stone to ensure it is level with the previous stone. This is a very important step, if your border is not level all the way around, your patio may take on some undesired highs and lows.
To ensure the border placement allows for an even placement of stone pavers, lay several stone pavers across the ground to the desired width. Then line up the border stack stones with the edge of the pavers. This will allow for just enough width so the pavers fit snugly reducing the need for cutting except where needed for corner areas of the patio.
Packing the Crushed Limestone for Your Stone Patio
Preparing the Surface and Packing the Ground
How to Install Pavers: Filling and Packing
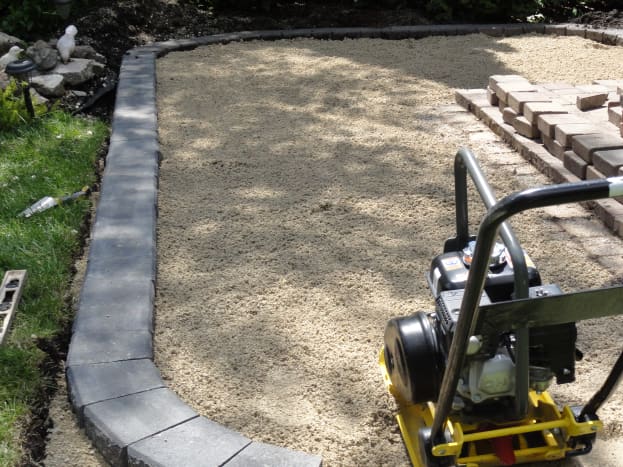
Once the border area is complete, you are ready to fill in the patio area with quarter down crushed limestone. You want to fill the area halfway up the height of the border coping (top) stones, use a rake or piece of two by four wood to smooth the crushed limestone so it is spread evenly though out.
With the limestone spread, you are now ready to pack it down. For patios and walkways, I prefer to use a 14-inch packer. You can get larger packers, but they are better suited for heavy load areas like driveways. Packers can be rented at your local home improvement center or other tool rental centers for as little as four hours (or more) at a time.
Read More From Dengarden
Simply move the packer onto the limestone and start it up. The ones I used are gasoline powered. Once started, all you have to do is steer, as they drive themselves. Don't try to back up, just keep going forward, turning as needed. I generally go over the entire surface at least two or three times. The crushed limestone hardens to a cement-like surface once packed and will provide a solid surface to lay the stone pavers on.
Installing the Stone Pavers
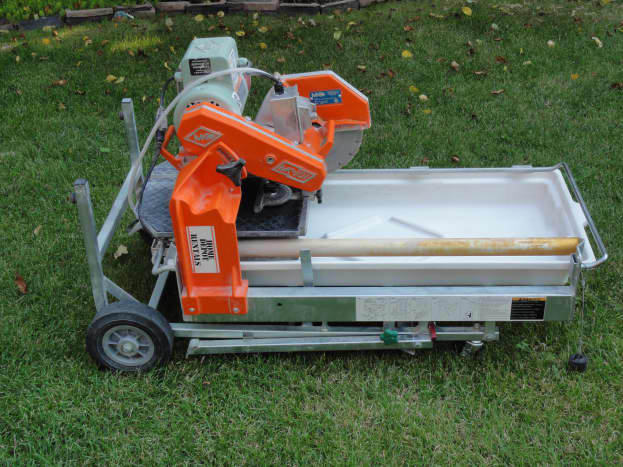
Cutting Stone Pavers With a Wet Saw
Installing the Paving Stones
How to Install the Paving Stones to Complete Your Paving Stone Patio
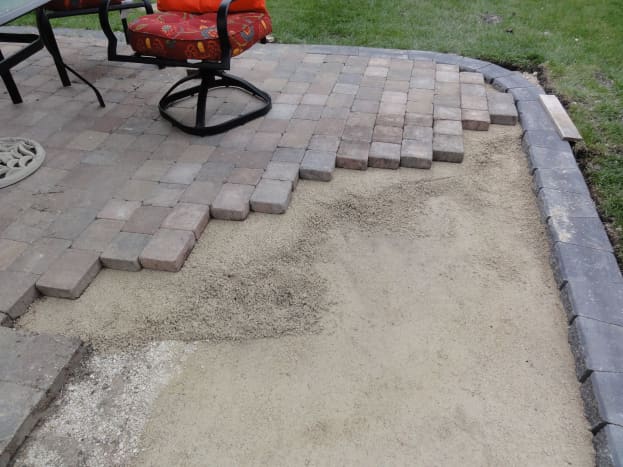
With the surface area packed, you now want to start on one end of the patio. Shovel in enough quarter down crushed limestone to allow the placement of 6 to 12 paving stones, usually two or three rows deep. If the limestone is dry, wet it down using a spray nozzle from your garden hose. This will allow you to smooth the limestone into the flat surface required. Again, you can use a two by four piece of wood or a metal garden trowel.
You want the limestone level high enough so the top of the paving stone will sit even or slightly higher than the border stones. Once you have smoothed the limestone into the correct height, simply place the paving stones in the desired pattern. For the Tuscany paving stones I used for my patio, the pattern is simple. Just lay the pavers end to end in a straight line, alternating different stone lengths. Continue these steps until the patio area is completely filled.
You will have some areas, especially in the corners where you will need to cut the stone pavers to fit. For this, you will need to rent a wet saw suitable for cutting paving stones. Since paving stones are thicker than stone tiles and many types of stone veneer, you will need a wet saw that has more power and a larger blade.
You can rent these wet saws at your local home improvement centers. They are easy to use: just fill the pail with water, drop in the pump, and you're ready to go. Be sure to follow all operation and safety instructions. Your home improvement center can provide you with an overview when you make the rental.
After the patio corners and other spaces have been filled in with the cut paving stones, use some fine sand to brush into the small crevices between the stones. Now all that's left for you to do is enjoy your paving stone patio. With proper packing during the preparation stage, your patio will look great for years to come. You'll never have to stain that deck again.
How to Use a Wet Saw to Cut Stone Pavers

Here's the finished product of my maintenance-free paving stone patio.
More Information on Using a Wet Saw to Cut Stone Tiles
- How to Cut Stone Tiles and Stone Veneer With a Wet Saw
For DIY projects requiring stone tiles or stone veneer, you will definitely need a wet saw. This guide will provide some basic guidelines.
This article is accurate and true to the best of the author's knowledge. Content is for informational or entertainment purposes only and does not substitute for personal counsel or professional advice in business, financial, legal, or technical matters.
Paul Cronin (author) from Winnipeg on May 10, 2013:
Thanks lions44, always glad to share with a fellow do-it-yourselfer and a fellow hubber. I love our back yard, the stone patio adds so much wow factor to our home, and no more fuss maintaining a wooden deck either.
CJ Kelly from the PNW on May 09, 2013:
Just came across your article by accident. Perfect timing for me as we're tearing down our deck and also installing a stone walkway along the side. Appreciate the tips. Keep up the good work.
Paul Cronin (author) from Winnipeg on June 29, 2012:
Thanks for the great comments Victoria Lynn. You can definitely use paving stones for a driveway, you would want to have cement curbs poured with some rebar lining the driveway, dig out deeper than the patio and fill with 3/4 down limestone. Then pack heavily. The rest would be the same, top with quarter down limestone... Tree roots must be removed, of course small ones are easy to dig out with a good shovel, but if the roots are big you may have to use a sharp axe or saw. Thanks again for the vote!
Victoria Lynn from Arkansas, USA on June 28, 2012:
Wow, what a job you did! And a great hub to show it step by step. Great photos, too. Would paving stones work for a driveway area? What if it has tree roots on it? Trying to figure out the best way to put something on an area in the yard where we back onto all the time. Excellent hub. Well done. Voted up and others.
How To Make A Stone Patio
Source: https://dengarden.com/home-improvement/How-to-Install-Paving-Stones-and-Build-a-Maintenance-Free-Stone-Patio
Posted by: burnettannold.blogspot.com
0 Response to "How To Make A Stone Patio"
Post a Comment