

How To Make Adjustable String Bracelets
Adjustable Closure for Friendship Bracelets
The Adjustable Closure for Friendship Bracelets is a versatile, neat, and easy way to create a functional bracelet. It is suited for polyester cords (like this Knotting Cord) that melt instead of burn.
The photos used in this tutorial are from our Super Easy Friendship Bracelet Kit, but we use this start and finish method for every friendship bracelet we do!
If you need a refresher on how to tie a Half Left Knot check out our Breezy Friendship Bracelet pattern.
Start

Cut all of the cords to the length as directed by the specific pattern.
Line up one end of the cords and tie them together in a simple overhand knot, 5 inches from the aligned ends. (Do not pull this knot too tight because you will be pulling it out later.) Safety pin the knot to your pants or to another secure location, or tape down the ends on a flat surface.
Finish
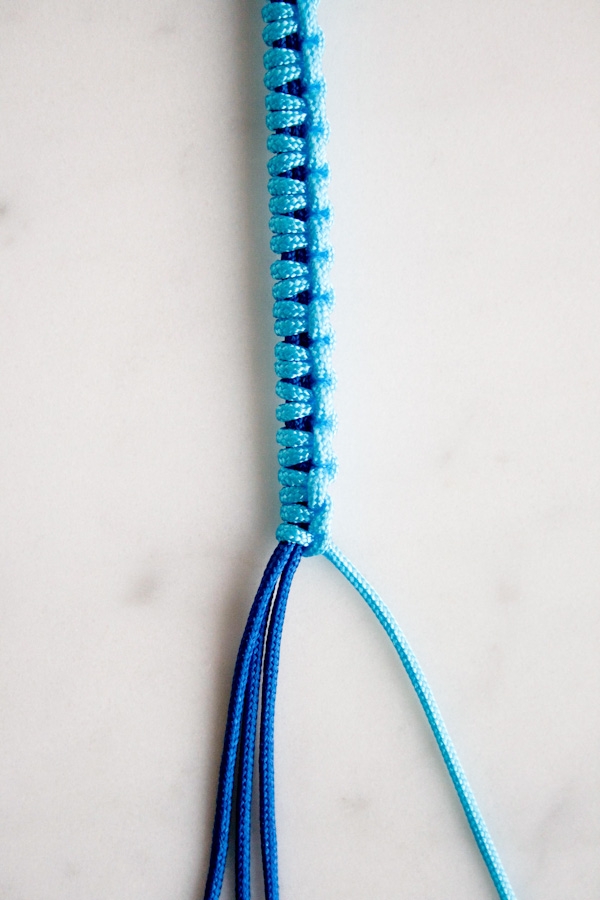
Once you have macraméd or braided your bracelet to the length directed in your pattern, select the right most cord (the Working Cord). Tie the Working Cord around all of the other cords (the Base Cords) with two Half Left Knots in a row and pull them very tight to the right.

Snip off the ends of the Base Cords a few millimeters beyond the last knot. Cut the Working Cord 2 inches from the last knot for kids or 3 inches for adults. Tie a simple overhand knot at the very end of the Working Cord's tail. Put one of the snipped off Base Cords aside. You will use it as the Tie Cord in the next step.
Use a lighter to quickly melt the ends of the Base Cords, as well as the knot at the end of the Working Cord tail. If you're a kid, please ask an adult to help you with this step.

Untie the beginning knot, and flip the bracelet around so that the cords are at the bottom, the Working Cord on the right and the Base Cords hanging straight down. Tie two Half Left Knots, pulling up and to the right, and then finish this end in the same manner as the first.

Now, arrange the bracelet in a circle, making sure it's not twisted. Lay the two 2 (or 3)-inch tails parallel to each other, with the knots facing in opposite directions.

Using the Tie Cord, tie a tight half-granny knot (like the first step of tying your shoes) around the two tails. Make the knot in the approximate center of the Tie Cord.

Turn the bracelet so the closure is at the left. Tie a Half Left Knot with the bottom tail of the Tie Cord and pull it up and to the right, snug against the knot.

Then rotate the bracelet so the closure is on the right. Tie a Half Left Knot with the (new) bottom tail of the Tie Cord and pull it up and to the right, snug against the other side of the knot.

Flip the bracelet over so the bottom side of the closure is face up and tie a half-granny knot with the two tails of the Tie Cord.

Snip off the tails of the Tie Cord, close to the knot, and melt the ends (or have an adult help you).
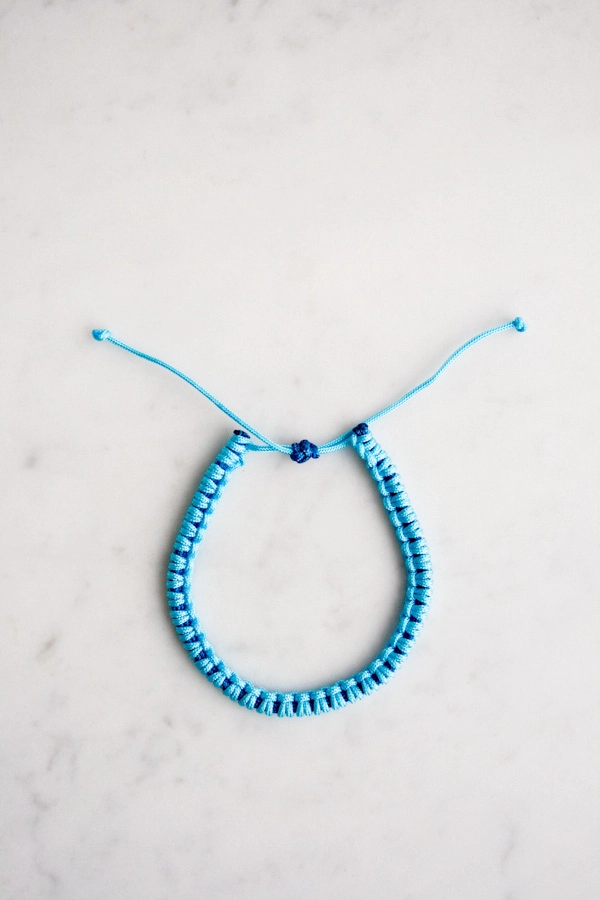
Pull the knotted tails away from each other and the bracelet will close!
How To Make Adjustable String Bracelets
Source: https://www.purlsoho.com/create/adjustable-closure-for-friendship-bracelets/
Posted by: burnettannold.blogspot.com
0 Response to "How To Make Adjustable String Bracelets"
Post a Comment